Tuesday, March 29, 2011

How to change the default folder where the install program

By default, if the windows operating system is installed on drive C, then the programs or software installed will be located in the folder C: \ Program Files. More and more shobat install the program or software, the more space is needed in the partition C and automatic residual space / volume on partition C will be minor. Thus it will be a slow computer performance.

To prevent this, we can overcome them by changing the default program installation folder from C: / Program Files to another folder that has been created specifically for the installation program (eg course, D: / Programku). Thus each of us to install the program, the installation program will lead to the folder D: / Programku not on C: / Program Files. For that we made some changes to the registry editor.
Go to the registry editor
Simply go to the HKEY_LOCAL_MACHINE \ SOFTWARE \ Microsoft \ Windows \ CurrentVersion
In the right pane, double-click on the key ProgramFilesDir
Change the value data from C: / Program Files to D: / Programku (or other folder that shobat desire)

How to change the default folder where the install program


Click OK
Restart or logoff computer
From now on if shobat do install a software or program, the file installasinya will be in the folder D: / Programku.
The steps above can be performed on Windows XP and Windows 7

How to activate the standby button in windows xp

The first time windows installed, the standby button on windows xp is usually still in a state of inactive or disabled. It is marked with a color standby button is gray, not yellow. This is very useful standby button once. When shobat leave the computer turned on and will be used again, then sebaiknyalah arranged so that the computer is in standby. In standby mode, the monitor will die while the cpu power only while living alone who was also in a state off the hard drive. Thus will save more electricity. If it will be used again just press the power button, it will appear the windows logon and shobat to continue the work that had been abandoned earlier.

How to activate the standby button in windows xp

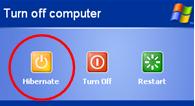
To access the standby button, it can be done as we will shutdown the computer. From the start menu, then select turn off computer, it will appear the windows turn off computer. There are 3 options are on stand by, turn off and restart. Just click on stand by, then the computer will be on stand-by condition. However, if the stand-by button is inactive, then to enable or unlock the keys to stand by this, it can be done by installing a VGA driver using the CD drivers from the computer's motherboard. If shobat not have the cd, shobat can be downloaded on the website of the brand motherboard.

Once installed, the stand-by button will become active and can be used.

Eliminating System Tray Icon

By the way already in the system tray out yet? Because of that, which is on the lower right corner, which deket at it loh! Have one day thinking, "How do eliminate this systray icons? While the application itself is still running?"

There is a trick that can be tried. Again, we play with using the registry editor. Go to Run then type Regedit, and then look for the following key: HKEY_CURRENT_USER Software Microsoft Windows CurrentVersion Policies Explorer, already?

then, right click on the right side window, and create a new DWORD Value with the name NoTrayItemsDisplay, then just double-click Value, and give a value of 1. Then logout or restart the PC, and look at the effects that occur. Icon in systray disappear!

speed up booting Windows XP

Booting on our computers getting slower? Okey, this time we will try to speed up booting Windows XP by editing the registry. Why can accelerate? Because the trick this time we try to disable a process called boot defragmenter. Boot process is used by Windows Defragmenter to rearrange files needed by Windows when booting. This function will be routinely done every time we turn on the computer. If you want to disable the Boot
Defragmenter, make sure that your files in a state-ordered.

To disable it, follow these steps:

1. Go to the registry editor, by pressing the start button> Run, then type regedit.

2. Go to the subkey HKEY_LOCAL_MACHINE SOFTWARE Microsoft Dfrg BootOptimizeFunction

3. In the right pane, find the String Value named [Enable], then double click
String Value.

4. Fill value to N to disable, and set the value to Y, to activate it again.

Restart your computer to get the desired result.

Broadcom's On Board With Linux. Who's Next?

Though they might not have admitted it in public at the time, Linux advocates spent a large of the last decade grumbling about poor support for wireless networking devices. A big source of their discontent was Wi-Fi chip maker Broadcom, which produced a lot of the mobile chipsets and never got around to releasing Linux drivers for its wares.

Now, however, Broadcom has begun to release Linux drivers licensed liberally enough for distribution with the Linux kernel. Besides making life easier for Linux laptop users, Enterprise Networking Planet columnist Brian Proffitt suggests that holdout manufacturers might start seeing the sense of broadening their own support of Linux.

Looking forward, the ease-of-use benefits will make it easier for Linux to be shipped as an OEM platform, and installed post-market by technology adopters. More importantly, having a major hardware vendor like Broadcom take a look at Linux and decide to invest the time and effort in creating a Linux driver should mean that other hardware vendors sitting on the fence regarding a Linux driver for their own offerings may come to the conclusion that Linux is something they can no longer ignore.

They may have come to that conclusion already. The success of the Android operating system has pushed a lot of vendors (including Broadcom) to create drivers for Android devices. The BCM4319 and BCM4329 SDIO chipsets were already supported on Android, which is close enough to Linux to get support for those devices into Android's predecessor. As Android shows up on more devices, you can expect to see more Linux-ready hardware drivers appearing in the near future.

Linux will also be collecting drivers on its own merits, I would expect. Whatever the tipping point was for Broadcom to release this driver, I have a hard time believing other vendors won't be following suit quickly, especially given how resistant to Linux Broadcom has been in the past.

It is, after all, just one driver among many, and there are indeed many more drivers needed. But Broadcom may the the leader of a driver rush for Linux, which is something the operating system has needed for a long time

Nice Windows ShortCuts

Windows
Logo+BREAK (Display the System Properties dialog box)
WindowsLogo+D (Display the desktop)
Windows Logo+M (Minimize all of the windows)
Windows Logo+SHIFT+M (Restore the minimized windows)
Windows Logo+E (Open My Computer)


CTRL+C (Copy)
CTRL+X (Cut)
CTRL+V (Paste)
CTRL+Z (Undo)
DELETE (Delete)
SHIFT+DELETE
(Delete the selected item permanently without placing the item in the Recycle Bin)
CTRL while dragging an item (Copy the selected item)
CTRL+SHIFT while dragging an item (Create a shortcut to the selected item)
F2 key (Rename the selected item)
CTRL+RIGHT ARROW (Move the insertion point to the beginning of the next word) CTRL+LEFT ARROW (Move the insertion point to the beginning of the previous word) CTRL+DOWN ARROW (Move the insertion point to the beginning of the next paragraph)


CTRL+A (Select all)
F3 key (Search for a file or a folder)
ALT+ENTER (View the properties for the selected item)
ALT+F4 (Close the active item, or quit the active program)
ALT+ENTER (Display the properties of the selected object)
ALT+SPACEBAR (Open the shortcut menu for the active window)
CTRL+F4 (Close the active document in programs that enable you to have multiple documents open simultaneously)
ALT+TAB (Switch between the open items)
ALT+ESC (Cycle through items in the order that they had been opened)
F6 key (Cycle through the screen elements in a window or on the desktop)
F4 key (Display the Address bar list in My Computer or Windows Explorer)
SHIFT+F10 (Display the shortcut menu for the selected item)
ALT+SPACEBAR (Display the System menu for the active window)

Windows Logo+U (Open Utility Manager) Accessibility Keyboard Shortcuts
Right SHIFT for eight seconds (Switch FilterKeys either on or off)
Left ALT+left SHIFT+PRINT SCREEN (Switch High Contrast either on or off)
Left ALT+left SHIFT+NUM LOCK (Switch the MouseKeys either on or off)
SHIFT five times (Switch the StickyKeys either on or off)
NUM LOCK for five seconds (Switch the ToggleKeys either on or off)
Windows Logo +U (Open Utility Manager) Windows Explorer Keyboard Shortcuts
END (Display the bottom of the active window)
HOME (Display the top of the active window)
NUM LOCK+Asterisk sign (*) (Display all of the subfolders that are under the selected folder)
NUM LOCK+Plus sign (+) (Display the contents of the selected folder)
NUM LOCK+Minus sign (-) (Collapse the selected folder)

Reverse the mouse buttons

1) No context menu

What will you see when you right click on the desktop? You will see a context menu which says arrange icons, refresh,..and so on. Are you angry at your friend for not wishing you for you B'day? Do you wanna play a trick on a newbie in your family who is new to computers? This is a cool trick to play. By this tweak, you will be able to disable the right click on the desktop or any icons/files/folders/applications... But right click will work on taskbar of the start button and registry. So, dont worry!!!

Open your registry and you will see all unknown files like HKEY_CLASSES_ROOT....... and so on. Don't panic. Follow this path.

HKEY_CURRENT_USER>SOFTWARE>MICROSOFT>WINDOWS>CURRENT VERSION>POLICIES>EXPLORER. On the right side of the registry, you will see two files(in general) named 'default' and 'NoDriveTypeAutoRun'. Right click on the empty space in the registry and goto New>DWORD VALUE and name it as "NoViewContextMenu". Remember, no spaces and N,V,C,M should be capitals. Right click on this and click modify. The default value will be 0. Change it to 1. Note: DONOT CHANGE THE HEXADECIMAL TO DECIMAL. Click OK. Close your registry and logout. Bingo!!! Once you login again, right click wont work. Your friend will be perplexed and the next thing he/she does is call the system administrator not knowing that not all system administrators will be knowing about registry. Now, to enable it again. follow the same path and set the value to 0. Logout and then login to see the effect.

2) Reverse the mouse buttons
This is a cool trick to play on newbies. Actually, there are two ways to do this. One is changing the settings in the Control panel and the other is through editing registry. You can do it either way. But I prefer the second way, which is challenging.
(i) Through Control Panel - goto Start> Control Panel> Printers and other hardware> Mouse. In Button configuration, enable the switch primary and secondary buttons option and click OK. But remember, you have just swapped the mouse buttons. So, for OK, you have to click the right mouse button. The newbie will be perplexed. Well, this trick is good for left handers.
(ii) Editing the registry - By default the left mouse button is the primary and the right is secondary. Open your registry and follow this path:
HLEY_CURRENT_USER>Control Panel>Mouse and on the right side of the registry, create this String value(REG_SZ): 'SwapMouseButtons' and set its value to 1. Bingo!!! You are done. Log out/Restart the computer.

You can try this: Combine tricks 1 and 2. That means, this will result in swapping of the mouse buttons and disabling the left click(once the buttons are swapped). User is ready to call system administrator cuz he feels that the system is behaving wildly.

How to find the IP address of the sender in Gmail

How to find the IP address of the sender in Gmail
When you receive an email, you receive more than just the message. The email comes with headers that carry important information that can tell where the email was sent from and possibly who sent it. For that, you would need to find the IP address of the sender. The tutorial below can help you find the IP address of the sender. Note that this will not work if the sender uses anonymous proxy servers.

Finding IP address in Gmail:

1.Log into your Gmail account with your username and password.

2. Open the mail.

3. To display the headers,* Click on More options corresponding to that thread. You should get a bunch of links.* Click on Show original.

4. You should get headers like this:Gmail headers : nameLook for Received: from followed by a few hostnames and an IP address between square brackets. In this case, it is65.119.112.245.That is be the IP address of the sender!

5. Track the IP address of the sender.

How to find the IP address of the sender in Hotmail

When you receive an email, you receive more than just the message. The email comes with headers that carry important information that can tell where the email was sent from and possibly who sent it. For that, you would need to find the IP address of the sender. The tutorial below can help you find the IP address of the sender. Note that this will not work if the sender uses anonymous proxy servers.
Finding IP address in Hotmail

1. Log into your Hotmail account with your username and password.
2. Click on the Mail tab on the top.
3. Open the mail.
4. If you do not see the headers above the mail message, your headers are not displayed. To display the headers,
* Click on Options on the top-right corner
* In the Mail Options page, click on Mail Display Settings
* In Message Headers, make sure Advanced option is checked
* Click on Ok button
* Go back to the mails and open that mail.

5. If you find a header with X-Originating-IP: followed by an IP address, that is the sender's IP addressHotmail headers : name ,In this case the IP address of the sender is [68.34.60.59]. Jump to step 9.
6. If you find a header with Received: from followed by a Gmail proxy like thisHotmail headers : nameLook for Received: from followed by IP address within square brackets[].In this case, the IP address of the sender is [69.140.7.58]. Jump to step 9.
7. Or else if you have headers like thisHotmail headers : nameLook for Received: from followed by IP address within square brackets[].In this case, the IP address of the sender is [61.83.145.129] (Spam mail). Jump to step 9.
8. * If you have multiple Received: from headers, eliminate the ones that have proxy.anyknownserver.com.
9. Track the IP address of the sender

How to find the IP address of the sender in Yahoo! mail

When you receive an email, you receive more than just the message. The email comes with headers that carry important information that can tell where the email was sent from and possibly who sent it. For that, you would need to find the IP address of the sender. The tutorial below can help you find the IP address of the sender. Note that this will not work if the sender uses anonymous proxy servers.

Finding IP address in Yahoo! Mail

1. Log into your Yahoo! mail with your username and password.
2. Click on Inbox or whichever folder you have stored your mail.
3. Open the mail.
4. If you do not see the headers above the mail message, your headers are not displayed. To display the headers,
* Click on Options on the top-right corner
* In the Mail Options page, click on General Preferences
* Scroll down to Messages where you have the Headers option
* Make sure that Show all headers on incoming messages is selected
* Click on the Save button
* Go back to the mails and open that mail.
5. You should see similar headers like this:Yahoo! headers : nameLook for Received: from followed by the IP address between square brackets [ ]. Here, it is 202.65.138.109.That is be the IP address of the sender!
6. Track the IP address of the sender

Keeping the Windows XP Core in the RAM

you have 512 MB or more of RAM, you can increase system performance by having the Windows XP 'Core' kept in the RAM instead of paged on the hard disk.

Go to Start -> Run - Type regedit and press enter - On the left hand side tree, navigate to

HKEY_LOCAL_MACHINE\SYSTEM\CurrentControlSet\Control\Session Manager\Memory Management\

- On the list on the right side, look for an entry called 'DisablePagingExecutive'
- Double click it
- Press 1 on your keyboard
- Click OK
- Exit regedit and reboot the computer

To revert to the default setting, follow the same steps as above, but this time, press 0(zero) instead of 1 on the keyboard.

Clean out the prefetch folder

Windows XP uses a system called 'prefetch' to organize and preload some of the data necessary for commonly used applications and files. A folder called prefetch is used to store the information the operating system needs to carry out this operation.

After several months of use, the prefetch folder may become quite overloaded with older references to software and files that may no longer be in use.It's a good idea to manually empty the older files out of the prefetch folder every few months or so.

To do this: Navigate to 'c:\windows\prefetch' and delete all .
PF files that are older than a week or two.

How to Delete a file Thumb.db

Thumb.db is is a cache of the current picture in that directory.to remove it go for following

step1 > open "WINDOWS EXPLORER".

2>go to "TOOLS".

3>open "FOLDER OPTIONS".

4>go to "VIEW".

5>see 1st section "FILES & FOLDERS".

6>click on the "DO NOT CACHE THUMBNAILS".

now the thumbnail file will be removed from ur computer once u do this the file will be never created.

How to Show ur name after time in taskbar

Hi freinds !

I m here to tell u a trick to add up ur name in place of AM and PM beside time and make urself to feel proud among ur group of frnds.

Its simple
Start -> Control Pannel -> Regional and LAnguage option -> Customize (beside English US) -> Go to TIME tab -> Change AM symbol and PM symbol from AM and PM to ur name -> Apply -> Ok ...

IS it changed ??? Might be not ...Now go to time in taskbar and Double Click it to open "Date and time property" ...Look place where time chnges in digital form i.e. 02:47:52 AM , click to arrow to cnage the AM or PM by selecting and press arrow. It will Show ur name or name that was entered by u, Apply -> OK and be HAPPY 8)

how to fix Error Reporting in XP

If error reporting in XP is bugging you then turn it off.

When a system error occurs in XP, a little dialog box appears asking if you want to report the error to Microsoft. Click the message box to make it disappear. You don't have to report the error if you don't want to and on today's "Call for Help" Leo shows you how to turn off the feature if you find it distracting.

To disable error reporting, follow these directions:

1. Right-click My Computer and choose Properties.
2. Click the Advanced tab on your System Properties dialog box.
3. Click the Error Reporting button on the Advanced tab.
4. Place a checkmark next to "Disable error reporting."
5. Leave the other radio button unchecked next to the text labeled, "But notify me when critical errors occur."
6. Click OK.

Hidden Programs In Windows XP

Is it strange to hear , but true that some good programs are hidden in Windows XP !!!

Programs :

1. Private Character Editor :

Used for editing fonts,etc.
** start>>Run
** Now, type eudcedit

2. Dr. Watson :

This an inbuilt windows repairing software !
** start>>Run
** Now, type drwtsn32

3. Media Player 5.1 :

Even if you upgrade your Media Player, you can still access your old player in case the new one fails !!!
** start>>Run
** Now, type mplay32

4. iExpress :

Used to create SetupsYou can create your own installers !
** start>>Run
** Now, type iexpress

Add Your Name (or) Application to right click Of My Computer

Caution ..
As it is related to Windows regisrty it can be dangerous
so,Try This at ur own risk


To write your name on right click application
please follow the steps.

1.Copy/Paste the following code in Notepad And then Save it as .reg

Windows Registry Editor Version 5.00
[HKEY_CLASSES_ROOT\CLSID\{20D04FE0-3AEA-1069-A2D8-08002B30309D}\shell\Registry Editor]
@="Your Name Or Name of the Application"
[HKEY_CLASSES_ROOT\CLSID\{20D04FE0-3AEA-1069-A2D8-08002B30309D}\shell\Registry Editor\command]
@="Location Of The Application"

2.Now edit it and then Type your name In

Eg:

[HKEY_CLASSES_ROOT\CLSID\{20D04FE0-3AEA-1069-A2D8-08002B30309D}\shell\Registry Editor]
@="Rajesh"

3. If u want to get any application, once you click Your name or name of application
Then , Type the location Of the application Which u want to open In:

[HKEY_CLASSES_ROOT\CLSID\{20D04FE0-3AEA-1069-A2D8-08002B30309D}\shell\Registry Editor\command]
@="Location Of The Application"

For eg.C:\Program Files\Yahoo!\Messenger\messenger.exe
Thats It finally save it And then Run it .

------------------------------------------------------------
To add Application Control Panel

[HKEY_LOCAL_MACHINE\SOFTWARE\Classes\CLSID\{20D04FE0-3AEA-1069-A2D8-08002B30309D}\shell\Control Panel\command]
@="rundll32.exe shell32.dll,Control_RunDLL"

To add Application Add/Remove

[HKEY_CLASSES_ROOT\CLSID\{20D04FE0-3AEA-1069-A2D8-08002B30309D}\shell\Add/Remove\command]
@="control appwiz.cpl"

To add Application Reboot

[HKEY_CLASSES_ROOT\CLSID\{20D04FE0-3AEA-1069-A2D8-08002B30309D}\shell\[Reboot]\command]
@="shutdown -r -f -t 5"

To add Application Shutdown

[HKEY_CLASSES_ROOT\CLSID\{20D04FE0-3AEA-1069-A2D8-08002B30309D}\shell\[Shutdown]\command]
@="shutdown -s -f -t 5"

-.-.-.-.-.-.-.-.-.-.-.-.-.-.-.-.-.-....-......----..--.-...--.-..-

Posted by Rajesh at 4:19 PM Links to this post
Tips to recover scratched CD's
1. Spread a cloth on a flat surface and place the CD on it.
2. Then, hold the disc with one hand, use the other to wipe the polish into the affected area with a soft cloth.
3. Wait for it to dry and buff using short, brisk strokes along the scratch, not across it.
4. A cloth sold to wipe spectacles or camera lenses will work super m8's.
5. When you can no longersee the scratch,, wash the disc with water and let it dry before playing. Intersting isnt it? Try it right now
I have used toothpaste with good effects before Ive also used car paint cutting compound on deeper scratches. It does leave lots of smaller scratches (as it is a cutting compound after all) but it will remove the worst scratches in most cases.
ya u r gng to b surely befinited by this Operation


* Fingermarks/prints cause 43% of disc problems!
* General wear & tear causes 25% of disc problems!
* Player-related issues cause 15% of disc problems!
* Remaining Others

How to Delete Administrator Password Computer

Method 1

Boot up with DOS and delete the sam.exe and sam.log files from Windows\system32\config in your hard drive. Now when you boot up in NT the password on your built-in administrator account which will be blank (i.e No password). This solution works only if your hard drive is FAT kind.

Method 2

Step 1. Put your hard disk of your computer in any other pc .
Step 2. Boot that computer and use your hard disk as a secondary hard disk (D'nt boot as primary hard disk ).
Step 3. Then open that drive in which the victim’s window(or your window) is installed.
Step 4. Go to location windows->system32->config
Step 5. And delete SAM.exe and SAM.log
Step 6. Now remove hard disk and put in your computer.
Step 7. And boot your computer

Wednesday, March 23, 2011

Reach the shutdown button missing

ormal shutdown button windows xp is in the start menu. When the start button is pressed or clicked on, in addition to the program menu, desktop, run and others there also there is a button to log off and shutdown buttons. But have you ever experienced friend shutdown button does not appear or disappear? Usually just realizes that shutdownnya button missing when going to turn off the computer. Wah so confused how to turn it off. If so then it could have been caused by a deliberate one to hide the shutdown button. Because there is a trick or a way to remove or hide the shutdown button. In such settings to turn off the computer actually does not have to by force or directly off electrical power. How normal can still be done by pressing the Ctrl + Alt + Delete or through task manager.

Reach the shutdown button missing

Back to the shutdown button is missing. Here is a trick to bring back the shutdown button is missing. Automatic if done otherwise then shutdown button will be missing:

  1. Go to the Group Policy Editor by opening the Run from the Start menu, then type gpedit.msc and press enter
  2. In the User Configuration select Administrative Templates and then select the Start Menu and Taskbar
  3. In the right pane double click Remove and Prevent Access to the shutdown command
  4. Change from enabled to Not Configured
  5. Click OK
  6. Restart or log off the computer.
Reach the shutdown button missing

Note: If you remove the settings and Prevent access to the shut down command is set to enabled, then the shutdown will be lost.

If you want to do the settings through the registry editor, the steps are as follows:
Now on the left navigation buttons to:
  1. Go to the windows registry editor by way of the run menu and type regedit and press enter.
  2. Sebaiknyalah first backup your regedit.
  3. Go to HKEY_CURRENT_USER \ Software \ Microsoft \ Windows \ CurrentVersion \ Policies \ Explorer. If. on the right panel there is no dword wil: wil, then create it with right click> New> Dword Value, type a name (rename) the name wil: wil.
  4. Double click on the wil: wil then change the value data to 0
  5. Close the Registry Editor
  6. Log off or restart the computer

How to disable windows media player

Windows media player is the default Windows media player application. Right now a lot of media player applications that have been issued by a third party. And the third made ​​it interesting applications are also freeware or free. So that computer users sometimes prefer to use windows media player application of a third party as an application to play a song or play a video, like winamp, KMPlayer, Power DVD, VLC Media Player, GOMPlayer, and others. Well than not used, windows media player is better off alone.

How to disable windows media player can follow the method below:

How to disable windows media player in Windows xp

1. Go to control panel
2. Select Add or Remove Programs
3. Click or select Add Remove Windows Components
4. In the Windows Components Wizard window, locate and remove the check in Windows Media Player, then click next
5. Wait until the completion (finish)

How to disable windows media player
disable windows media player in Windows xp

How to disable windows media player in Windows 7

1. Go to control panel
2. All items on the window view, select / click Programs and Features
3. In the left pane, click Turn Windows Features on or off
4. In the Windows Features window, expand the Media Features.
5. Remove the check mark in Windows Media Player
6. If there is a message that appears click Yes
7. Click OK

How to disable windows media player
disable windows media player in Windows 7

How to disable windows gadgets in Windows 7

In Windows 7 there are additional tools that users can use to ease the use of computers in the form of gadgets. This gadget is installed on the desktop that can be utilized easily. Gadget provided by windows 7 is for example Clock, Calendar, CPU Meter, and others. If want other gadget can be downloaded online at the link provided.
How to disable windows gadgets in Windows 7

However, If a friend wishes to disable this gadget windows with a view to accelerate and increase the performance of Windows 7, or because they never use it, then it can be followed on how to disable gadget windows 7 below:

  1. Go to control panel
  2. All items on the window view, select / click Programs and Features
  3. In the left pane, click Turn Windows Features on or off
  4. In the Windows Features window, remove the check mark on the Windows Gadget Platform
  5. Click OK
  6. Wait until the process is complete
  7. Restart computer

Enabling missing the folder options

Folder options in windows explorer is in the tools menu on windows xp. Folder options serves to make arrangements click items (double click or single click to open a file), Browse folders, files and folders settings including show hidden files or settings, file types and others. However, due to a virus, folder options on tools menu may not appear or are disabled, so the user can not make arrangements regarding the files and folders and so forth.

Enabling missing the folder options
To bring up or activate the folder options are missing this can be done with minimal settings on windows registry editor.

Open windows registry editor then go to:

HKEY_CURRENT_USER \ Software \ Microsoft \ Windows \ Current Version \ Policies \ Explorer

HKEY_LOCAL_MACHINE \ Software \ Microsoft \ Windows \ Current Version \ Policies \ Explorer

In each of the key above the right pane delete the DWORD with name NoFolderOptions.
Log off or restart the computer.

Until here first Tutorial Johan Computer about Enabling missing the folder options. Difficulties or if any suggestions please write in the comment section below

Monday, March 21, 2011

Know who the William Reddington Hewlett

Know who the William Reddington Hewlett
When we hert the word "Hewlett" may our minds will immediately imagened a well-know brands of printers that Hewlett-Packard (HP). one of the company founder was William Reddington Hewlett (1913-2001). Hewlett born 20, 1913 in ann Arbor, mich...in 1939, Hewlett founded the company Hewlett-Packed (HP) along with David Packed, who died in 1996. The company was established only with an initial capital $538. Hewlett Packard name, Of course, take from their respective names. At Hewlett-Packard Company, Hewlett has held various important posiyions. bus since 1978, Hewlett quit from his post as Chief Executive Oficcer.

During a student, Hewlett received several degrees from various universities. In 1934, Hewlett received his BA (Bachelor of Arts) was from Stanford University. His master's degree in Electrical Engineering, he can from the Massachusetts Institute of Technology (MIT) in 1936. And 3 years later, Hewlett received his engineering from Stanford University. Please also note that Hewlett is the man who received 13 Honorary Degrees from universities. While studying at Stanford University, he met with David Packard of Hewlett eventually became good friends.

Know who the William Reddington Hewlett
Hewlett career practically interesting. During World War-2, Hewlett has worked in the U.S. Army. During his tenure at the U.S. Army, Hewlett belonging to a team assigned to Japan as industrial inspection of the 2nd world war ended. In 1947, after returning from his duty was, Hewlett went to Palo Ato. He started working in the company he founded with David Packard, and served as vice president at Hewlett-Packard Company. In 1957, he was appointed Executive Vice President. 7 years later, Hewlett served as President of HP. In 1969, he was appointed Chief Executive Officer. Hewlett hold this position for 9 years. In 1978, he quit from his post it.


Hewlett was one who dedicated his life to the advancement of science and technology. Therefore, in 1985, U.S. President Ronald Reagan awarded the National Medal of Science to William Reddington Hewlett for his services in developing science and technology. Hewlett received the award which is the highest science award in America. Hewlett also is a person who has great attention to the problems of education, health and social. He has a lot of work in various agencies, such as at Stanford Medical Center, Kaiser Foundation Hospital, The Carnegie Institution of Washington and Drug Abuse Council in Washington.
Know who the William Reddington Hewlett

William Reddington Hewlett died on January  12, 2001, at the age 0f 87 years. However, the name of the Hewlett will continue to always be remembered by many people because the company he founded wiyh David Packard, is one of the best companies in the world which is engaged in IT ( Information Technology ). Hewlett Packard productively create various devices such as PDA ( Personal Digital Assistent ), Printers, Computers and more. today, goods produced in Hewlett Packard widely used bt people worldwide.

Introduction of Delphifor Beginners

Delphi is a package of programming language that works within the windows operating system. is aprogramming language that has a wide range of ability is quite sophisticated. varios applications can be made by Delphi, including to procces text, graphics, number, database and web applications.

Okay, not know it was love mybe the words just we learn to program with delphi is good that we know in advance the contents of delphi 7.

As foer how to start Delphi as follows :
  • Click The start button.
  • highlight programs, then Borland delphi 7
  • Ready to use delphi.

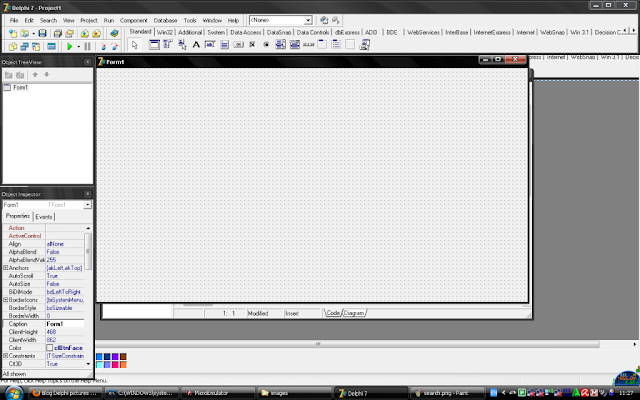
Views Borlan Delphi 7 IDE
Introduction of Delphifor Beginners

From the above consists of several parts, namely :
  • at the top there is the menu toolbar, ie toolbar that contains icons to take action against the program that we create. usually called the component palette.
  • Object treeview windows containing the view layout object.
  • Object inspector window that contains the properties and events tabs.
  • Object form is the place to design programs that will be created.
  • Object editor is a window that will be used to write programs, to open the object editor can use the F12 key.

Sunday, March 20, 2011

Recent Post Widget as Headline News

Recent post widget as Headline News is one widget that much-love by the bloggers. besides it takes place with a lot of  blogs, Recent Post widget as Headline News also makes the blog look more attractive.

Okey, to Shorten the time just give the steps for producing Recent Post Widget as Headline News :
1. Go into your Blogger Account.
2. Once you are in the dashboard, then select the tab design.
3. Click Add a gadgets. display will appear like the picture below.
Recent Post Widget as Headline News

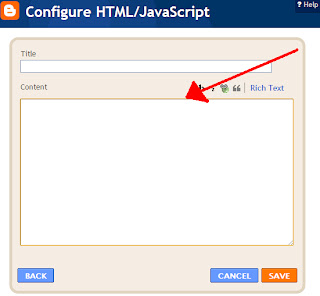
4. Add the HTML / JavaScript. it will appear again display as below.
Recent Post Widget as Headline News

5. On the title blank. conten fill in the following code.
<script type="text/javascript">
    var jc_url_blog = "http://johancomputers.blogspot.com/";
    var jc_count_post = 20;
    var jc_color_backgroud = "white";
    var jc_color_line = "black";
    var jc_position = "bottom";
    var jc_show_title = true;
    var jc_backlink = true;
</script>
<script src="https://sites.google.com/site/johanbone/gadget/Headlinenews-jc.js"></script>
red printed on paper that can change within their your own.
var jc_url_blog = "http://johancomputers.blogspot.com/"; Change with your blog url
var jc_count_post = 10Count recent post that will appear
var jc_color_backgroud = "white"; Background color
var jc_color_line = "black"; Line color
var jc_position = "bottom"; Position of the widget can you change the top or bottom according to your wishes

Among Tutorial Johan Computer Recent Post Widget as Headline News. if any difficulties or suggestions please write in the comment section below

How to Disable Autorun in Windows Xp

At this time the spread of virus, spyware or malware lot via a USB Flash disk. flash disk that is infected with the virus when connected to the computer is clean (no viruses), and the computer default settings to enable it autoplay or autorun, then the computer wil be infected with a virus, unless the computer already has the latest AntiVirus updates that identify the virus.

The following step by step how to disable autorun in windows xp :
1. Click the start button ---> Run.
2. Type gpedit.msc and click  OK.
3. Click on Computer Configuration ---> Administrativ Template ---> System.
4. Double click on turn off Autoplay.
How to Disable Autorun in Windows Xp

5. Click the Enable option.
6. At the option Turn off Autoplay on, select All drives.
7. Click OK
8. Repeat step 4,5,6,and 7  on User Configuration  ---> Administative Templates ---> System

Hopefully useful article Johan Computer this time. For those of you who want to add or refute the above tips,
i wait in the comments box.... Thank you.

Causes Damage to Hard disk

Hard Drive is the mai data storage hardware on the computer. without hard drive, the computer can not be used optimally, because it looks just the writings of black and white.
Causes Damage to Hard disk
Hard disk is a sensitive hardware. There the several things that cause damage to the hard disk. However, the most severe is the electrical flow in a sudden death, nemely :

1. Lights off, the solution is to use a special adapter that can store electricity for severalminutes. so when the lights off occurs, the computer still on and still have a chance to shut down the computer safely.

2. Resset, as people think that pressing the button on the CPU resset is a small thing, but this is very dangerous for the hard disk. the reason is when the needle drive is working, then the posotion was in the middle of the disk drive. And if we press the button resset, then the needle will be simultaneosly moved to the edge of the dish and leave scratch marks then there badsector. therefore, do not carelessly resset button.

Just tips if the computer hangs and there is no other way than pressing the resset. wait until the disk light (usually red) to deadth, though its flame is flashing, press the button when the lights resset hard drive is dead or not lit.

Hopefully useful article Johan Computer this time. For those of you who want to add or refute the above tips, i wait in the comments box.... Thank you.

How to Turn off computer quickly and safely

For people who lack patience, waiting for the computer off (which hangs) is sometimes a bit annoying. if the stabilizer off directly from her, the stakes are hard to be broken. so what's the solution to turn off the computer quikly and safely.

For some people, there might be who do not know what it is Hibernate. Hibernate is a program from windows xp to speed up the turn off or turn off the computer. This program is suitable for busy people.

How to enable hibernate is :
1. Go to dekstop.
2. Right click and select properties
3. Select the screen saver
How to Turn off computer quickly and safely

4. Then click the power button
5. After the Sow a new look, and the select the hibernate tab and check the box hibernate
How to Turn off computer quickly and safely

6. After that click ok and hibernate on your computer is active.

Then you too bia try, First do you click start and turn off, then press the shift and will appear hibernate button, then click the button.
How to Turn off computer quickly and safely

Usually the speed of this computer shut down depending on whether or not large RAM memory. but it will not turn off the computer during normal way (turn off).

That Johan Computer Tips an tricks this time, may be useful.........

Tips for saving Data safe from viruses

Storing data is an activity that must and should be done by computer users. Typically data is stored on harddrives such as Harsd disk, floppy disk, flash disk etc...But what if the data stored was attacked by a virus??? this is a big problem.

Curently, the devlopment became increasingly virus. But we also have to be smart to do. one of them is by using antivirus. but the weakness of this antivirus is a virus attacked data sometimes can not be saved. thefore, here are some tips on how to save the data to be safe from viruses. and i think these tips are very suitable for storage on the flash.

First, conpress we want to store data in to flash using winzip or winrart. because the virus can not infect files in *.zip file.

Second, Store the data (mainly the result of typing) you with format *.txt, the way is to go into be notpad, than enter the results of typing and save. viruses can not infect file with *.txt format.

Third, save the data with html format, the way is by clicking save as document, than change the file type it into html.

That little tips on how to safely store data from virus attacks.

hopefully useful

Saturday, March 19, 2011

How to Create a Hotspot

Hotspots or places that provide Internet access services using wireless. If you want to open a Cafe business, or restaurant, for those interested and come to your home, you can make free Internet service for those who visit. This is because a number of devices that have been equipped with wireless technology, so the trend is the use of a higher.

How to Create a Hotspot
Unfortunately, not everyone understands how to build Wi-Fi infrastructure. Lack of information and perhaps a somewhat expensive price makes many business owners are reluctant to build a hotspot. In fact, there is great potential to add hotspots interest and also to increase revenues from the place itself.

This article will discuss important things you need to know to provide the hotspot service. This is discussed is relatively simple that can be followed by beginners though (as long as it already has the basics of network). At the end of the article, we discuss a tool that is practical enough to be used to create a hotspot.


Equipment Needed to Make a Hotspot:

1. Access Point.
How to Create a Hotspot

Function Access Point as a hub / switch on the local network, which acts to connect the local network with a wireless network / wireless the client / your neighbors, this is an access point internet connection from where you are emitted or transmitted via radio waves, the size also affects the signal strength coverage area will be achieved, the higher the signal strength (size in units of dBm or mW) to expand its reach.

2. Omni Antenna
How to Create a Hotspot
To expand the coverage area until a few Kilometers, you need an external omni antenna, even when you buy an access point equipped with omni antenna, but not enough because only a magnitude of about 3-5dB, to expand the coverage area, you'll need an external omni antenna, flat - average 15db power. Omni antenna has a radiation beam or 360 degrees, so the match can reach the client from any direction.

3. Box Access Point
How to Create a Hotspot
To protect your access point, need a box-shaped protective device, can be made of plastic or metal plate, the average box is equipped with a safety lock, and this box should be placed immediately below the antenna.

4. Pigtail
How to Create a Hotspot
Jumperl Pigtail wires or cables needed to connect between the omni antenna to the access point, the maximum length of notice required only 1 meter, if an extension you will experience signal degradation (dB loss) at both ends of the cables have connectors that plug type connector according to the inherent your access point.

5. POE (Power Over Ethernet)
How to Create a Hotspot
That the power cable has not been raised to "turn on" access point then you need a tool "POE" This tool serves to mengalirankan electricity via an ethernet cable or UTP / STP, with this tool you will not need to bother buying another power cord to the top of the tower , more practical and economical.

6. Cable UTP / STP
How to Create a Hotspot
Cables UTP / STP is needed to connect an access point with a network cable at your local LAN, so the computer can be connected to the Gateway / Router or Hub / Switch, select cable UTP / STP good quality to improve the quality of electricity through the POE. stpot

7. Anti-lightning (Lightning Arrester)
As a safety from lightning then you need a tool that serves to channel the electrical overload when lightning struck the cable earthing (grounding), this component is installed on jumper cables between devices and access points with external antennas. Grounding for lightning rods are generally planted with copper to a depth of several meters to reach the water.

8. Tower
How to Create a Hotspot
To get the maximum coverage area of ​​coverage, you need to raise external omni antenna to a high place for the WLAN client you can catch your radio signals properly.

Good luck ... :)

Why Flash Drive Not Detected Computer???

Flash Drive Not Detected Computer
Some things that should be suspected when the UFD (USB Flash Disk) that we have not detected when plug into PC, among others:

- Damaged USB Port
- Setting problem (Bios, Windows)
- Driver problems
- Damaged by Physical
- Etc.
Why Flash Drive Not Detected Computer
To try to overcome it can be done the following points:Try our USB plug in another USB port / switch-move, if they have not managed to try to plug into another PC, if successful then we are not problematic USB and suspicion 100% to the PC.

Or do the opposite, try another USB socket on your PC (if any) / or other devices that use USB ports. By assumption, if the tools we connect is detected, the USB ports are not problematic.

Check the BIOS settings may disable intentionally or not, this could have happened does not change the settings with the motherboard battery when we realize we've worn out / weak.

Check in Device Manager, follow these steps:
  1. Click Start> Settings> Control Panels.
  2. Double Click on the icon system,
  3. Once open Syistem Properties window, click the Hardware tab
  4. Click the Device Manager button
  5. Then check on the Universal Serial Bus Controllers, it appears there was a problem
  6. A question mark in this section indicates the hardware is not recognized or td driver
  7. Red cross marks in this section indicates disabled, so if this happens do right click and select enable
  8. Included in this is likely to re-install the USB Flash disk driver.
Check the registry, how:
  1. Click Start> Run
  2. Enter: regedit then enter
  3. Go to: HKEY_LOCAL_MACHINE \ SYSTEM \ CurrentControlSet \ Services \ UsbStor
  4. The value Dwords be worth 3 (enable), if not 3 then update with 3 and then close and restart
Another possibility is a PC infected by virus, it must be cleared of the virus by using anti-virus

If you suspect a new software that is installed as the cause then try to uninstall the software first.

Try using a software utility to find and mount the partition (hopefully can).

How to Shutdown Windows with Time Bomb

Shutdown Windows with Time Bomb
Exactly what the title above sich mean?, He .. he ... Yes this is a trick where if you click on an icon that is didesktop us so our windows will shutdown in a period that we have set previously.

How to Shutdown Windows with Time Bomb
This trick I learned while traveling on YouTube and this trick also can we use for computer ignorant of our friends.

if you do not know the tricks then this trick would be considered a virus, because of what?, this trick will issue a small pop up window notifying you that the windows will shut down within a few seconds, like a time bomb which was filmed Loch. And the pop ups can not be eliminated, either by way of task manager or anything else unless we have a key.

Here's how to how to Shutdown Windows with Time Bomb:
Right-click on the desktop, then select new shortcut, then you will see a small window, then input into a text box = shutdown-s-t 600-c "Your message"

Example: shutdown - s-t 600-c "Greetings from Johan Computer" (figure 600 is a unit of seconds, so 600 = 10 minutes, and that number can be changed as desired)

Then click next, then you will be asked to make for your icon, you are free to give any name, this time I as an "Internet Explorer", then click Finish.

Successful, but its really ugly icon huh?, for that right click on the icon, then click properties, click change icon, Just click ok if there is confirmation, then select the icon to taste (I'm here with the example of the Internet Explorer icon). OK , apply, OK.

Then let's try double-clicking the icon, then if true it will come out a confirmation that the windows will shutdown in a few minutes.

Well if allowed to continue then it will actually shutdown.
To address them, simply click Start, select Run, then typing shutdown.

GOOD TRY... ;P

Wednesday, March 16, 2011

Keylogger, Concept and its Usage

Hi all friend, this time Johan Computer will share some of the things I know about a software called keylogger.

Keylogger (Spy Software) is a hidden program that functioned to monitor any activity using the keyboard keys. Keylogger is closely connected with the theft of passwords. One of the widely used hacking techniques to take over confidential data on someone's computer without the computer owner's consent authority (administrator).

Keylogger, Concept and its Usage
How Keylogger work ???
Keylogger runs in the background (hidden) without the knowledge of the computer owner. Shortly after a keylogger be installed on the computer, the program will run every computer restart and difficult to be detected. Anti-virus sometimes are also unable to detect because the keylogger was not designed in the form of the virus.

If the keylogger has been running, this software will monitor every activity of a keyboard button is pressed, then store it in log form (reports) that can only be seen by people who install the keylogger. Keylogger will display a program or an address that opened situr then any key typed.

Types of keylogger
Based on its use, the keylogger consists of two types. Local keylogger that only work on local computers and remote keylogger, keylogger that can monitor computer in the network.

Keylogger running on the local computer usually consists of only a single program be installed on local computer. This Keylogger will monitor all activities of the keyboard keys are used. Kelemahanya, because this type of keylogger is only used on local computers, the report recorded the button can not be viewed from another computer / remote.

Meanwhile, remote keylogger to monitor other computers in a network. Keylogger This type usually consisting of from two files. Diinstalkan first installer file on the server computer to monitor and second installer files be installed on client computers (the victim's computer.) Method of installing a second file there are several ways. The most popular is using a trojan. So that programs can be installed by itself like a computer virus.

Based on the physical, in addition to the form of software, keylogger is also available in the form of hardware or known by the name of the Hardware Keylogger. This type of keylogger is usually installed in series with the keyboard. Excess Hardware keylogger which is used by many security companies of the world is capable of storing at least 2 billion data typed keystrokes or save memory for 5 years.

Utilization Keylogger
Like most other computer programs. Keylogger was originally used to monitor the client computer in the network. But now widely used keylogger ability to tap other people's computers and steal important information such as your username and password e-mail, login accounts, credit cards, etc..

Transfer Gmail Contacts to Outlook

Transfer Gmail Contacts to Outlook
This time Johan Computer will share a tips and tricks in using Ms.Outlook. As I wrote at the title, which I will tell this time is how to transfer Outlook Contacts Into Gmail is "automatic" instead of typing it one by one into Ms.Outlook.

After I saw a lot of my friends who use Ms.Outlook complain if you have to type the email contacts one by one into Outlook, I became intend to share these tips to his fellow gentlemen, may have been many who know this way. The masters do not be bored reading it well. hehehe

There is a quick way to Transfer Gmail Contacts to Outlook. Here's How.
  • Go into your Gmail account, and select Contacts, then select all the Contacts and then select all eat each contact will be at the check directly.
  • Click Export in the top right box
  • Select the Outlook's CSV format (for importing into Outlook and Other applications), click Export.
  • Click Save and save it wherever you want.
The next thing we do is import the contacts into Ms.Outlook
  • Open up your Ms.Outlook and then click File, Import and Export
  • In the Import and Export Wizard, select Import from another program or file, then click NEXT.
  • Next select Comma Separated Values ​​(DOS) and click NEXT.
  • Click on Browse to find the CSV file that you created earlier, and select the option you want. Here we do not import the same item, so just select Do not import aja Duplicate items. And then? Click next again.
  • Select a folder or a location to save it and then select Next.
  • The next choice, is basically verify what we have done all this and also offers the option to change their destination folder. If it is definitely with your choice of these. Just click Finish.
Here's how to quickly Transfer Gmail Contacts to Outlook, just 10 easy steps necessary ribet aja koq ga-complicated type 1 per 1 contacts. Hopefully these tips and tricks useful for all my friends.

Toothpaste Safe for Pasta Processor?

Warm Greetings friends all come back I posted about computer problems, hemmmm many days I have to mess around with the same problems that still wrote "my computer please mas mas ngerestart own, please repaired yes!" Sentence that I'm bored I hear every day, after my hem check was indeed the condition of the processor is too hot to make your computer restarts, I just took the paste to take steps for cooling the processor, after the pasta turns out opened uh, wow, how?

Toothpaste Safe for Pasta Processor
Turns out my friend and teacher who provides advice, why not use toothpaste only. I continue to try friends this way, although they look more extreme where the processors are given toothpaste, looks bad but after I tried it the results steady friend, comrade pc can run normally, then I think why you have a pastas selling processors if we use any toothpaste can be useful, hemmm finally I was looking at various forums was the use of toothpaste in cooling the processor could be used as a last resort when you run out of pasta processor, hemmm but in the long range, if you use toothpaste as processor cooling it will clot and close the flow air leading to the processor, so I suggest you better use the processor pasta sajadan only use toothpaste only as a backup just friends, okay so first hemmm yes friends, often to the blog often play this trick 2mind yes, hopefully this article can be useful to a Friend friends all.

Tuesday, March 15, 2011

Introduction C Language

The root and origin of the C programming language (C language) is language BCPL, developed by Martin Richards in 1967. This language gives ideas on Ken Thompson who later developed a language called B calls in 1970. Further development of language B is the C language written by Dennis Ritchie around in the 1970s at Bell Telephone Laboratories Inc. (now the AT & T Bell Laboratories). C language was first used on the computer Digital Equipment Corporation PDP-11 that uses the UNIX operating system entirely.

Introduction C Language
Standard C language (Ansi C) is native to the standard of UNIX. The operating system, C compiler and all the essential UNIX application programs written in C language C language Kepopularan make each version of this language created for many types of micro-computer. To make this versi2 become standard, ANSI (American National Standards Institutes) established a committee (ANSI Committee X3J11) in 1983 which then set the ANSI standard for C language ANSI Standard is based on the standard UNIX expanded.

C language has more ability than with other programming languages​​. Language C is a programming language that is portable, a program created specifically with the C language on a computer will be able to run on another computer with a few (or no) no change.

C language is the language used for programming purposes sesebuah operating system, among others, is to make:
  1. Assembler
  2. Interpreter
  3. Compilers
  4. Operating Systems
  5. Assistance Program (utility)
  6. Editor
  7. Application program package
Some programs such as dBase circulating created using the C language, even the UNIX operating system was also created using C language C language is really a versatile programming language and its use is not limited to programming the system only, but also can be used for other applications such as room bisnes, mathematics mahupun game equipment.

Introduction C Language

In some structures, C language is classified as a middle language (medium level language). This classification is not a means to the C language is not strong or too complicated compared with high-level language (high level language - such as Pascal, Basic, Fortran, Java, and lain2), affirmed that free C language is not language-oriented machine that is characteristic of the language level low (low-level language), namely machine and assembly language.

In fact, the language C are combined by the elements in high-level language and low-level language, namely the ease in making the programs offered at the high-level language and perlaksanaan speed of low-level language.

Plus and Minus C language
Language C has several advantages compared with other programming languages, namely:
  • C language has a complete service for manipulating data.
  • Various data structures and control processes are provided in C, allowing a structured program made, even the object-oriented program (OOP = Object Orientied Programming).
  • On appeal to the language or set of machine (assembly), C is much more easily understood and the programmer does not need to know more about the structure of the computer used, so do not follow the time in solving problems in the form of a program. C is an issues-oriented language (object), and not oriented to the machine.
  • Velocity near the speed perlaksanaan perlasanaan C program created by low-level language, but the ease of programming is equivalent to a high level language.
  • C language allows to manipulate the data in the form of bits and bytes in efisyen. Besides it is also possible to manipulate the address of the data in C are called pointers.
Another plus is that the process is faster than the speed of the other programming languages. When compared with the programming language BASIC, C programming language can do 50 times faster than the BASIC programming language. Language pengaturcaraan C has a library (library) that allows programmers to develop a broader program without having to write the whole program.

As for weaknesses, or rather the C programming language difficulties mainly felt by pemulaan programming are:
  • Number of operators as well as the writing program fleksibiliti sometimes confusing new users who are still unfamiliar with the problem kerana.
  • The entry level C programmer generally have never known a pointer and not used to using it, walhal stability of the C language is indeed located on pointer2nya.
But the weaknesses and difficulties noted above are usually only temporary. in short, more extensive use of C language in the development and preparation of the Operating System.

Utilizing WOS Portable as Portable Server

Nowadays there are many practical applications containing the installation package of Apache, PHP and MySQL like PHPTriad, WAMP5, XAMPP, AppServ, Wosportable and so forth. Wosportable one of the many installation packages in a bundle. In contrast to applications such as PHPTriad, WAMP5 and XAMPP, Wosportable an installation package that is more practical in the installation and is portable.

Be portable here means we can carry and store wosportable applications into the flash media and we can contiue the work of web programming that abandoned the office and continued home or on a different computer. here lies the advantage of wosportable, we can bring Apache, PHP and MySQL into the flash media or other stotage media. with this wosportable deserves the title as a portable server

Wosportable This package contains: Apache2 (Version 2.2.3), MySQL5_SE (Version 5.0.24) and PHP5_SE (Version 5.1.6) and can be downloaded on site with the following url address:
http://www.chsoftware.net/

Instalattion Wosportable
Once we download Wosportable will get the file is a wosportable.zip, we first extract the zip file.

Then we double-click on the file wos.exe

After a few seconds then comes the installation language choice, here are two choices of languages ​​namely English and German.

For the moment we choose English (Home) and clicked the OK button

This section is information onabout the terms of use and problems wosportable license . We have to give a mark on the box "I understand and accept this conditions ...." And click OK.

The next stage we menginstallasi package contained in this wosportable include:
Apache2 (Version 2.2.3)
MySQL5_SE (Version 5.0.24)
PHP5_SE (Version 5.1.6)
And then click the install button.

It would appear the information "Do you Want To install all packages now? we select OK. After that we will get the message straight.

This is information that the process intallasi Apache2, MySQL5_SE and PHP5_SE having successfully implemented. it will show a display monitor wosportable status.

Here is given information on the status of the Apache and MySQL in the road / running. In order not to disturb us can do to minimize this menu. And also can shut down and restart the application path.

In the next stage whether we can open the Mozilla Firefox browser, IE or another. And typed localhost will appear as follows:

Localhost shown they appear related information on Wosportable. In the testbed included a package of information that we have diinfokan installalkan and also our server's document root location. So we put on the document root web application files we. Need iperhatikan if we menginstallasi installation packages such as TYPO3, Joomla, WordPress and others in the document root, the administration login is to be the "admin" with password is "password".

enjoy using WOS Portable, we can make the webserver where we are, just copy all the folders and taken anywhere enggunakan usb stick, flash card or hard drive. And run the webserver will start wos.exe the road.

Monday, March 14, 2011

How to classify a file in windows explorer

The data that we created and then stored in the form of a file, will usually be accessed or opened again via windows explorer. Files that are stored can be stand alone or are grouped together in a folder. More and more files or folders that have made it much harder to find and open the file. To facilitate the search for a file or folder on a drive we can classify files into the folder type, the same kind. Or it could also be grouped based on sequence file name.

By using how to group the file or folder, we can categorize files by typenya. Excel file will be joined with the excel files, all files ms word will be grouped into a single, pdf files will be grouped into one as well. Besides according to type, we can also sort files by date the file is created is by using the modified filter. The file you just created will be at the top. To sort or classify files based on the size of the measure can be done by selecting the filter size, and to sort and classify files by name or select only the filter name.

To make the settings file grouping mentioned above, can be done with the easy way:
  1. Open Windows Explorer (press the windows + E)
  2. Open the drive or folder that will be grouped.
  3. In the right pane, right click on empty space and select Arrange icons by
  4. Select one option among the name, size, type, modified and activate the option Show in groups
  5. How to classify a file in windows explorer
  6. Then your file will be grouped according to the options above.

Sunday, March 13, 2011

How to Browsing Without Trace

How to Browsing Without Trace
After Johan Computer chat with some of internet users, I finally chose to post the tricks How to Browsing Without Trace. Many Internet users are complaining because the browsing activity is always known by other people and complained the lack of privacy in browsing. Although the usefulness considering these internet pages to facilitate users in browsing for example in terms of accelerating the opening of a page. But well because sometimes the problem is not browsing other people want to know, why Info Computer & Information Technology will discuss a bit about how to browse without a trace.

here you how to eliminate trace:
  1. Click "Start > All Program > Mozilla Firefox".
  2. Once the program is open Firefox, click the menu "Tools> Start Private Browsing".
  3. If there are sites that are still open when you are setting it, would appear situas confirmation that you open will be closed, stored and later will be open again after a session of "Browsing without a trace. " Answer Confirm by clicking the button "Start Private Browsing".
  4. Then a moment will open a new window firefoz ready for browsing without a trace.
Here is how easy it is to browse without a trace. Hopefully this info is useful to Internet users who want their privacy maintained: D

Thursday, March 10, 2011

What is FoxServ?

For those of you who want to learn and interested in web programming may currently be confused with the number of web programming that offers a variety of features and ease of existing facilities. Quite a lot of web programming available today such as ASP (Active Server Pages), PHP (Hypertext Preprocessor), Perl / CGI (Common Gateway Interface), JSP (JavaServer Pages), CFM (Coldfusion), and so forth. Of the many web programming above, maybe PHP is currently being widely used. The factors that make PHP more widely used by web developers is:
  1. PHP are free alias does not pay.
  2. Its programming language easy to learn and is equipped with a function-function built in a rather large and easy for users.
  3. Supporting PHP, such as: Apache Webserver, MySQL database are free. So that will reduce costs incurred. This is especially affecting cheap hosting prices for servers that support PHP.
  4. Community of PHP users very much. So that would make it easier for us if you have trouble while to develop applications.
From the above factors will be many also support PHP applications that simplify the user, especially for people new to using PHP as its web programming language. To start using PHP we need to install a web server in our computer that can be obtained at http://www.apache.org, then install MySQL as a database server in our computer that can be downloaded at http://www.mysql.com, and the last that we have to install PHP on your computer by downloading it first on http://www.php.net The steps above must be very troublesome for the users of PHP are still common. Moreover, if we do not understand what kind of work a web server? and database server work it like how?.

Well, to reduce these difficulties, many in-develop the application bundle that is easier for users of PHP to run PHP on our computers. The application bundle is a fairly widely known today is Foxserv.

Apa itu FoxServ ?
Foxserv is a package installer for Windows systems that have applications in PHP, MySQL, and Apache. For version 3.0 has been supports PHP as a module, PEAR, and Zend
Optimizer.

Some applications are similar to existing FoxServ advance of PHPTriad.Namun unfortunately, PHPTriad until now been discontinued development and J Wynia PHPTriad-developer more interested in creating a "paid version" of his, named Sokkit
(http://www.sokkit.net).

Then there is also use installer for Windows which contains a bundle of PHP, MySQL, Apache made ​​friends KIOSS (Community OpenSource Indonesia) is given the name DongKRAK (http://www.kioss.com/kiossproyek.php?nama=aDongKRAK) and DingKLIK (http://www.kioss.com/kioss/proyek.php?nama=aDingKLIK) - minimalist webserver that supports PHP.

Twitter Delicious Facebook Digg Stumbleupon Favorites More