Tuesday, March 29, 2011

How to change the default folder where the install program

By default, if the windows operating system is installed on drive C, then the programs or software installed will be located in the folder C: \ Program Files. More and more shobat install the program or software, the more space is needed in the partition C and automatic residual space / volume on partition C will be minor. Thus it will be a slow computer performance.

To prevent this, we can overcome them by changing the default program installation folder from C: / Program Files to another folder that has been created specifically for the installation program (eg course, D: / Programku). Thus each of us to install the program, the installation program will lead to the folder D: / Programku not on C: / Program Files. For that we made some changes to the registry editor.
Go to the registry editor
Simply go to the HKEY_LOCAL_MACHINE \ SOFTWARE \ Microsoft \ Windows \ CurrentVersion
In the right pane, double-click on the key ProgramFilesDir
Change the value data from C: / Program Files to D: / Programku (or other folder that shobat desire)

How to change the default folder where the install program


Click OK
Restart or logoff computer
From now on if shobat do install a software or program, the file installasinya will be in the folder D: / Programku.
The steps above can be performed on Windows XP and Windows 7

How to activate the standby button in windows xp

The first time windows installed, the standby button on windows xp is usually still in a state of inactive or disabled. It is marked with a color standby button is gray, not yellow. This is very useful standby button once. When shobat leave the computer turned on and will be used again, then sebaiknyalah arranged so that the computer is in standby. In standby mode, the monitor will die while the cpu power only while living alone who was also in a state off the hard drive. Thus will save more electricity. If it will be used again just press the power button, it will appear the windows logon and shobat to continue the work that had been abandoned earlier.

How to activate the standby button in windows xp

To access the standby button, it can be done as we will shutdown the computer. From the start menu, then select turn off computer, it will appear the windows turn off computer. There are 3 options are on stand by, turn off and restart. Just click on stand by, then the computer will be on stand-by condition. However, if the stand-by button is inactive, then to enable or unlock the keys to stand by this, it can be done by installing a VGA driver using the CD drivers from the computer's motherboard. If shobat not have the cd, shobat can be downloaded on the website of the brand motherboard.

Once installed, the stand-by button will become active and can be used.

Eliminating System Tray Icon

By the way already in the system tray out yet? Because of that, which is on the lower right corner, which deket at it loh! Have one day thinking, "How do eliminate this systray icons? While the application itself is still running?"

There is a trick that can be tried. Again, we play with using the registry editor. Go to Run then type Regedit, and then look for the following key: HKEY_CURRENT_USER Software Microsoft Windows CurrentVersion Policies Explorer, already?

then, right click on the right side window, and create a new DWORD Value with the name NoTrayItemsDisplay, then just double-click Value, and give a value of 1. Then logout or restart the PC, and look at the effects that occur. Icon in systray disappear!

speed up booting Windows XP

Booting on our computers getting slower? Okey, this time we will try to speed up booting Windows XP by editing the registry. Why can accelerate? Because the trick this time we try to disable a process called boot defragmenter. Boot process is used by Windows Defragmenter to rearrange files needed by Windows when booting. This function will be routinely done every time we turn on the computer. If you want to disable the Boot
Defragmenter, make sure that your files in a state-ordered.

To disable it, follow these steps:

1. Go to the registry editor, by pressing the start button> Run, then type regedit.

2. Go to the subkey HKEY_LOCAL_MACHINE SOFTWARE Microsoft Dfrg BootOptimizeFunction

3. In the right pane, find the String Value named [Enable], then double click
String Value.

4. Fill value to N to disable, and set the value to Y, to activate it again.

Restart your computer to get the desired result.

Nice Windows ShortCuts

Windows
Logo+BREAK (Display the System Properties dialog box)
WindowsLogo+D (Display the desktop)
Windows Logo+M (Minimize all of the windows)
Windows Logo+SHIFT+M (Restore the minimized windows)
Windows Logo+E (Open My Computer)


CTRL+C (Copy)
CTRL+X (Cut)
CTRL+V (Paste)
CTRL+Z (Undo)
DELETE (Delete)
SHIFT+DELETE
(Delete the selected item permanently without placing the item in the Recycle Bin)
CTRL while dragging an item (Copy the selected item)
CTRL+SHIFT while dragging an item (Create a shortcut to the selected item)
F2 key (Rename the selected item)
CTRL+RIGHT ARROW (Move the insertion point to the beginning of the next word) CTRL+LEFT ARROW (Move the insertion point to the beginning of the previous word) CTRL+DOWN ARROW (Move the insertion point to the beginning of the next paragraph)


CTRL+A (Select all)
F3 key (Search for a file or a folder)
ALT+ENTER (View the properties for the selected item)
ALT+F4 (Close the active item, or quit the active program)
ALT+ENTER (Display the properties of the selected object)
ALT+SPACEBAR (Open the shortcut menu for the active window)
CTRL+F4 (Close the active document in programs that enable you to have multiple documents open simultaneously)
ALT+TAB (Switch between the open items)
ALT+ESC (Cycle through items in the order that they had been opened)
F6 key (Cycle through the screen elements in a window or on the desktop)
F4 key (Display the Address bar list in My Computer or Windows Explorer)
SHIFT+F10 (Display the shortcut menu for the selected item)
ALT+SPACEBAR (Display the System menu for the active window)

Windows Logo+U (Open Utility Manager) Accessibility Keyboard Shortcuts
Right SHIFT for eight seconds (Switch FilterKeys either on or off)
Left ALT+left SHIFT+PRINT SCREEN (Switch High Contrast either on or off)
Left ALT+left SHIFT+NUM LOCK (Switch the MouseKeys either on or off)
SHIFT five times (Switch the StickyKeys either on or off)
NUM LOCK for five seconds (Switch the ToggleKeys either on or off)
Windows Logo +U (Open Utility Manager) Windows Explorer Keyboard Shortcuts
END (Display the bottom of the active window)
HOME (Display the top of the active window)
NUM LOCK+Asterisk sign (*) (Display all of the subfolders that are under the selected folder)
NUM LOCK+Plus sign (+) (Display the contents of the selected folder)
NUM LOCK+Minus sign (-) (Collapse the selected folder)

Reverse the mouse buttons

1) No context menu

What will you see when you right click on the desktop? You will see a context menu which says arrange icons, refresh,..and so on. Are you angry at your friend for not wishing you for you B'day? Do you wanna play a trick on a newbie in your family who is new to computers? This is a cool trick to play. By this tweak, you will be able to disable the right click on the desktop or any icons/files/folders/applications... But right click will work on taskbar of the start button and registry. So, dont worry!!!

Open your registry and you will see all unknown files like HKEY_CLASSES_ROOT....... and so on. Don't panic. Follow this path.

HKEY_CURRENT_USER>SOFTWARE>MICROSOFT>WINDOWS>CURRENT VERSION>POLICIES>EXPLORER. On the right side of the registry, you will see two files(in general) named 'default' and 'NoDriveTypeAutoRun'. Right click on the empty space in the registry and goto New>DWORD VALUE and name it as "NoViewContextMenu". Remember, no spaces and N,V,C,M should be capitals. Right click on this and click modify. The default value will be 0. Change it to 1. Note: DONOT CHANGE THE HEXADECIMAL TO DECIMAL. Click OK. Close your registry and logout. Bingo!!! Once you login again, right click wont work. Your friend will be perplexed and the next thing he/she does is call the system administrator not knowing that not all system administrators will be knowing about registry. Now, to enable it again. follow the same path and set the value to 0. Logout and then login to see the effect.

2) Reverse the mouse buttons
This is a cool trick to play on newbies. Actually, there are two ways to do this. One is changing the settings in the Control panel and the other is through editing registry. You can do it either way. But I prefer the second way, which is challenging.
(i) Through Control Panel - goto Start> Control Panel> Printers and other hardware> Mouse. In Button configuration, enable the switch primary and secondary buttons option and click OK. But remember, you have just swapped the mouse buttons. So, for OK, you have to click the right mouse button. The newbie will be perplexed. Well, this trick is good for left handers.
(ii) Editing the registry - By default the left mouse button is the primary and the right is secondary. Open your registry and follow this path:
HLEY_CURRENT_USER>Control Panel>Mouse and on the right side of the registry, create this String value(REG_SZ): 'SwapMouseButtons' and set its value to 1. Bingo!!! You are done. Log out/Restart the computer.

You can try this: Combine tricks 1 and 2. That means, this will result in swapping of the mouse buttons and disabling the left click(once the buttons are swapped). User is ready to call system administrator cuz he feels that the system is behaving wildly.

Keeping the Windows XP Core in the RAM

you have 512 MB or more of RAM, you can increase system performance by having the Windows XP 'Core' kept in the RAM instead of paged on the hard disk.

Go to Start -> Run - Type regedit and press enter - On the left hand side tree, navigate to

HKEY_LOCAL_MACHINE\SYSTEM\CurrentControlSet\Control\Session Manager\Memory Management\

- On the list on the right side, look for an entry called 'DisablePagingExecutive'
- Double click it
- Press 1 on your keyboard
- Click OK
- Exit regedit and reboot the computer

To revert to the default setting, follow the same steps as above, but this time, press 0(zero) instead of 1 on the keyboard.

How to Show ur name after time in taskbar

Hi freinds !

I m here to tell u a trick to add up ur name in place of AM and PM beside time and make urself to feel proud among ur group of frnds.

Its simple
Start -> Control Pannel -> Regional and LAnguage option -> Customize (beside English US) -> Go to TIME tab -> Change AM symbol and PM symbol from AM and PM to ur name -> Apply -> Ok ...

IS it changed ??? Might be not ...Now go to time in taskbar and Double Click it to open "Date and time property" ...Look place where time chnges in digital form i.e. 02:47:52 AM , click to arrow to cnage the AM or PM by selecting and press arrow. It will Show ur name or name that was entered by u, Apply -> OK and be HAPPY 8)

Sunday, March 20, 2011

Causes Damage to Hard disk

Hard Drive is the mai data storage hardware on the computer. without hard drive, the computer can not be used optimally, because it looks just the writings of black and white.
Causes Damage to Hard disk
Hard disk is a sensitive hardware. There the several things that cause damage to the hard disk. However, the most severe is the electrical flow in a sudden death, nemely :

1. Lights off, the solution is to use a special adapter that can store electricity for severalminutes. so when the lights off occurs, the computer still on and still have a chance to shut down the computer safely.

2. Resset, as people think that pressing the button on the CPU resset is a small thing, but this is very dangerous for the hard disk. the reason is when the needle drive is working, then the posotion was in the middle of the disk drive. And if we press the button resset, then the needle will be simultaneosly moved to the edge of the dish and leave scratch marks then there badsector. therefore, do not carelessly resset button.

Just tips if the computer hangs and there is no other way than pressing the resset. wait until the disk light (usually red) to deadth, though its flame is flashing, press the button when the lights resset hard drive is dead or not lit.

Hopefully useful article Johan Computer this time. For those of you who want to add or refute the above tips, i wait in the comments box.... Thank you.

How to Turn off computer quickly and safely

For people who lack patience, waiting for the computer off (which hangs) is sometimes a bit annoying. if the stabilizer off directly from her, the stakes are hard to be broken. so what's the solution to turn off the computer quikly and safely.

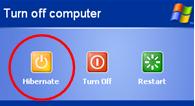
For some people, there might be who do not know what it is Hibernate. Hibernate is a program from windows xp to speed up the turn off or turn off the computer. This program is suitable for busy people.

How to enable hibernate is :
1. Go to dekstop.
2. Right click and select properties
3. Select the screen saver
How to Turn off computer quickly and safely

4. Then click the power button
5. After the Sow a new look, and the select the hibernate tab and check the box hibernate
How to Turn off computer quickly and safely

6. After that click ok and hibernate on your computer is active.

Then you too bia try, First do you click start and turn off, then press the shift and will appear hibernate button, then click the button.
How to Turn off computer quickly and safely

Usually the speed of this computer shut down depending on whether or not large RAM memory. but it will not turn off the computer during normal way (turn off).

That Johan Computer Tips an tricks this time, may be useful.........

Tips for saving Data safe from viruses

Storing data is an activity that must and should be done by computer users. Typically data is stored on harddrives such as Harsd disk, floppy disk, flash disk etc...But what if the data stored was attacked by a virus??? this is a big problem.

Curently, the devlopment became increasingly virus. But we also have to be smart to do. one of them is by using antivirus. but the weakness of this antivirus is a virus attacked data sometimes can not be saved. thefore, here are some tips on how to save the data to be safe from viruses. and i think these tips are very suitable for storage on the flash.

First, conpress we want to store data in to flash using winzip or winrart. because the virus can not infect files in *.zip file.

Second, Store the data (mainly the result of typing) you with format *.txt, the way is to go into be notpad, than enter the results of typing and save. viruses can not infect file with *.txt format.

Third, save the data with html format, the way is by clicking save as document, than change the file type it into html.

That little tips on how to safely store data from virus attacks.

hopefully useful

Saturday, March 19, 2011

How to Shutdown Windows with Time Bomb

Shutdown Windows with Time Bomb
Exactly what the title above sich mean?, He .. he ... Yes this is a trick where if you click on an icon that is didesktop us so our windows will shutdown in a period that we have set previously.

How to Shutdown Windows with Time Bomb
This trick I learned while traveling on YouTube and this trick also can we use for computer ignorant of our friends.

if you do not know the tricks then this trick would be considered a virus, because of what?, this trick will issue a small pop up window notifying you that the windows will shut down within a few seconds, like a time bomb which was filmed Loch. And the pop ups can not be eliminated, either by way of task manager or anything else unless we have a key.

Here's how to how to Shutdown Windows with Time Bomb:
Right-click on the desktop, then select new shortcut, then you will see a small window, then input into a text box = shutdown-s-t 600-c "Your message"

Example: shutdown - s-t 600-c "Greetings from Johan Computer" (figure 600 is a unit of seconds, so 600 = 10 minutes, and that number can be changed as desired)

Then click next, then you will be asked to make for your icon, you are free to give any name, this time I as an "Internet Explorer", then click Finish.

Successful, but its really ugly icon huh?, for that right click on the icon, then click properties, click change icon, Just click ok if there is confirmation, then select the icon to taste (I'm here with the example of the Internet Explorer icon). OK , apply, OK.

Then let's try double-clicking the icon, then if true it will come out a confirmation that the windows will shutdown in a few minutes.

Well if allowed to continue then it will actually shutdown.
To address them, simply click Start, select Run, then typing shutdown.

GOOD TRY... ;P

Wednesday, March 16, 2011

Toothpaste Safe for Pasta Processor?

Warm Greetings friends all come back I posted about computer problems, hemmmm many days I have to mess around with the same problems that still wrote "my computer please mas mas ngerestart own, please repaired yes!" Sentence that I'm bored I hear every day, after my hem check was indeed the condition of the processor is too hot to make your computer restarts, I just took the paste to take steps for cooling the processor, after the pasta turns out opened uh, wow, how?

Toothpaste Safe for Pasta Processor
Turns out my friend and teacher who provides advice, why not use toothpaste only. I continue to try friends this way, although they look more extreme where the processors are given toothpaste, looks bad but after I tried it the results steady friend, comrade pc can run normally, then I think why you have a pastas selling processors if we use any toothpaste can be useful, hemmm finally I was looking at various forums was the use of toothpaste in cooling the processor could be used as a last resort when you run out of pasta processor, hemmm but in the long range, if you use toothpaste as processor cooling it will clot and close the flow air leading to the processor, so I suggest you better use the processor pasta sajadan only use toothpaste only as a backup just friends, okay so first hemmm yes friends, often to the blog often play this trick 2mind yes, hopefully this article can be useful to a Friend friends all.

Monday, March 14, 2011

How to classify a file in windows explorer

The data that we created and then stored in the form of a file, will usually be accessed or opened again via windows explorer. Files that are stored can be stand alone or are grouped together in a folder. More and more files or folders that have made it much harder to find and open the file. To facilitate the search for a file or folder on a drive we can classify files into the folder type, the same kind. Or it could also be grouped based on sequence file name.

By using how to group the file or folder, we can categorize files by typenya. Excel file will be joined with the excel files, all files ms word will be grouped into a single, pdf files will be grouped into one as well. Besides according to type, we can also sort files by date the file is created is by using the modified filter. The file you just created will be at the top. To sort or classify files based on the size of the measure can be done by selecting the filter size, and to sort and classify files by name or select only the filter name.

To make the settings file grouping mentioned above, can be done with the easy way:
  1. Open Windows Explorer (press the windows + E)
  2. Open the drive or folder that will be grouped.
  3. In the right pane, right click on empty space and select Arrange icons by
  4. Select one option among the name, size, type, modified and activate the option Show in groups
  5. How to classify a file in windows explorer
  6. Then your file will be grouped according to the options above.

Sunday, March 13, 2011

How to Browsing Without Trace

How to Browsing Without Trace
After Johan Computer chat with some of internet users, I finally chose to post the tricks How to Browsing Without Trace. Many Internet users are complaining because the browsing activity is always known by other people and complained the lack of privacy in browsing. Although the usefulness considering these internet pages to facilitate users in browsing for example in terms of accelerating the opening of a page. But well because sometimes the problem is not browsing other people want to know, why Info Computer & Information Technology will discuss a bit about how to browse without a trace.

here you how to eliminate trace:
  1. Click "Start > All Program > Mozilla Firefox".
  2. Once the program is open Firefox, click the menu "Tools> Start Private Browsing".
  3. If there are sites that are still open when you are setting it, would appear situas confirmation that you open will be closed, stored and later will be open again after a session of "Browsing without a trace. " Answer Confirm by clicking the button "Start Private Browsing".
  4. Then a moment will open a new window firefoz ready for browsing without a trace.
Here is how easy it is to browse without a trace. Hopefully this info is useful to Internet users who want their privacy maintained: D

Thursday, March 10, 2011

What cause a computer restart on its own?

What cause a computer restart on its own
Hi all friend, Hi friend of all, on this occasion I will discuss about computer problems that pretty much happened, this morning I was dealing with a computer that is having problems, lol the problem is when I turn on the computer, the computer can turn on normally, and can get into bios normally, but when loading in windows direct computer suddenly restart, lol what ya think about that broken?

The first diagnosis:
  1. prosesor was too hot so he immediately entered into the system restarts (pasta processors less)
  2. terjadi corrupt the file system so when coming to a windows computer restart
  3. kemungkinan last, the power supply down power, which makes when he went into windows is not strong power supply and finally the computer has restarted
okay ya operating directly on the computer, lol we go to dianosa first, I immediately gave pasta processor, hoping that when logging into windows the processor is not too hot, and can optimally get into windows it turns out, the result is the same computer still ngrestart.

okay go to the second diagnosis, there corrupt files in windows system file, for this diagnosis, I was trying to get into safe mode, which is in windows, by pressing f8 and safe mode option, lol it also could be his time loading g windows dead.

lol go to the worst friend by checking the power supply, just check with a new power supply which is bener bener be friends, once ignited ignited immediately wrote a friend, lol turns into windows with lancer lancer only friend, lol so does the damage is on power supply, lol So even if the power supply to turn on with normal but klo is the power of a power supply declined to make, the computer restarts itself when he went into the operating system, because when it entered into a computer operating system requires a high enough power supply which makes power supply that power will go down with automatic restart, lol okay so first post my friend about this computer problem, you can also read the articles "a paste dentifrice processor" "cool tools for computer services", may be useful for all friends.

Monday, March 7, 2011

Restoring the recycle bin icon is missing

Recycle bin icon on the desktop is very useful to see the files that have been removed and placed in the recycle bin quickly. Thus we can arrange or manage the files that have been deleted or erased for us restore or permanently deleted. In addition to the recycle bin icon on the desktop, we can empty the recycle bin files quickly is by right click and choose Empty Recycle Bin.

But there are times when by chance or for some reason, ... suddenly the recycle bin icon on the desktop is lost or erased. So that we can not manage the files in the recycle bin, either to be removed permanently or the restore again.

Below is a way to bring back the recycle bin icon on the desktop.

  • Right-click on the desktop, then select personalize
  • In the left panel click Change Desktop Icons
  • Write a check or enable the recycle bin box
  • Click OK

In windows xp can be tried by the way:
  • Right click on desktop then select properties
  • Click the Desktop tab and then click Customize Desktop
  • In the window that appears check the recycle bin
  • Click OK

Security Keeping PDF Files

Security Keeping PDF Files
Johan Computer this time will give a few tips to maintain the security of the pdf file. Digital products popping up in increasingly crowded Internet, the average use pdf files as a reference in the manufacture of digital products. Thus the pdf file security is very important because it can ensure that digital products are not scattered everywhere. Well, certainly in hell napain confused love the info that was moldy so, are you a pdf file can be fitted password. Even so, that would still be edited, copied or printed if it is in open condition lor. Well, so this time I will try to give some tips and tricks for digital product makers for their important files are not printed and distributed everywhere.

Here's his trick.
  1. Once given a password, select "Document> Security> Show Security settings for this document", until the document properties window appears.
  2. Click the "Security" tab. In the Document Security, "Password Security" has been active. Press the "Change Settings." Security Password dialog box opens. In option "Compatible", choose which version to support your pdf file. hmm .. I choose "Acrobat 5.0 and later", to allow the document to be read by Acrobat 5.0 to the latest version.
  3. In the "Permission", choose the option "use a password to restrict printing and editing of the document and its security settings." Bottom, going out empty box that prompts you to enter a password.
  4. By default, the option "none" has been presented on the menu option that lies within. If this is left alone, you can not print a document you know. In fact, there are two choices of the quality level of prints when you allow the file pdf still be printed, the low resolution and high resolution.
  5. After all the stages to follow, select "ok". You will be asked to use a password. Furthermore, the program will recommend you to save and close the pdf file so that changes can walk.
After that you simply save the pdf file then each time you open the same file, you will be asked for your password. Once inside, only then can check the results.

Yes .. finally finished as well. With this, you will maintain the security of your pdf file without the fear of the scattered everywhere. computers & tech info hopefully this information is useful to you all. hahaha.............

Sunday, March 6, 2011

How to burn data to a CD without the software in windows xp

Save data to cd on windows xp is mostly done is to use a burner software like nero, deep burner and other such software. By using burning software in addition to burning data there is usually also a feature for burning video, audio, and also to burn the iso file. Many people who do not know, actually in windows xp can to burn or save data to cd without using any software. If only for data burning purposes only or to save data to cd / dvd only, then in windows xp is no facility for burning data.

The main requirement to be able to burn data to cd is none other rather than just a computer using a CD rom or DVD rom rewritable rewritable. Yes ... only that, the rest we can use the features available on windows xp. CD or DVD that used to be a CD-R or CD-RW, as well as a DVD. For the steps can be listened to like the method below:

  1. Enter cd / dvd rom blank into the CD Rewritable
  2. Copy data or files to be saved or burning to CD / DVD
  3. Paste it into the drive cd rom / dvd rom then you will have the message Files ready to be written to the CD
  4. Select or block files / folders that have been pasted on the CD rom drive earlier
  5. Click the file menu and then select Write this files to CD
  6. How to burn data to a CD without the software in windows xp
  7. CD writing wizard window appears, type the name of your CD in the CD name.
  8. How to burn data to a CD without the software in windows xp
  9. If you activate the close the wizard after the files have been written, then the wizard will be automatically closed when the burning process is complete.
  10. Click next and the process of burning data to a cd will run until completion.
  11. How to burn data to a CD without the software in windows xp
  12. CD will come out by itself from the cdrom.

Sharing files to friends or other people will be safer when using the CD. By using the CD, it will reduce the risk of computer virus from someone else's computer. Unless the data or files on the cd that contains a virus. Unlike when sharing files using a flash. Although the computer or data available free of virus, but when plugged into another computer got a virus, then the flash will also be exposed to the virus. Well if this flash plug into our computers, then we will also be attacked by computer viruses. But it's all there are advantages and disadvantages of each, it is up to you all.

Saturday, March 5, 2011

Delete files permanently without going through the recycle bin

By default when you delete a file, the file will be accommodated in the recycle bin. Files that are accommodated in the recycle bin this can still be in the restore again if you do not want to be removed. Can we delete the file also to empty the recycle bin to empty recycle bin command. Although the deleted files were still on to appear or be saved by using the tools or software restore deleted data.

More and more files are collected in the recycle bin, it also will reduce the capacity of the hard disk. Which ultimately could also make a slow computer performance. If the friend does not want the deleted files were recovered in the recycle bin, it can be done by using means or tricks like this:
  1. Go to Group Policy Press the Windows key + R to open run menu, then type gpedit.msc and press enter
  2. Log on User Configuration> Windows components> Windows explorer
  3. In the right pane, double-click on Do not move deleted files to the Recycle Bin
  4. Change to Enable and click OK
  5. Close the window gpedit then log off or restart the computer.
The second way is through the properties of the recycle bin icon on the desktop.
  1. Right click the recycle bin icon on the desktop and select Properties.
  2. Activate or check the Do not move files to the Recycle Bin
  3. Click OK
Another way is also easy to delete files permanently without going to the recycle bin is:

  1. After selecting the files to be deleted, press and hold down the shift key and press the delete button.
  2. Click Yes to delete the file. Then the file will be deleted without going into the recycle bin.

If the computer shobat tuneup utilities installed, then delete the files permanently can be done by right clicking on files to be deleted then click tuneup shredder

Twitter Delicious Facebook Digg Stumbleupon Favorites More